Call of Duty 2 Custom Loading Screen
This guide explains how to create and apply a custom loading screen for your multiplayer map in Call of Duty 2. Replace yourmapname with your actual map name throughout the process.
1. Create the Image
You can either create a custom image manually or take an in-game screenshot of your map.
Taking a Clean Screenshot (Recommended)
- Run your map using the CoD2 compile tools with developer mode enabled (this automatically puts you in the correct mode).
- Enter spectator mode.
- Open the console (~ key) and type:
This removes the HUD for a clean screenshot./cg_draw2D 0 - Move to a good viewpoint in the map.
- Press F12 (default screenshot key).
The screenshot will be saved in your Call of Duty 2 main/screenshots folder.
2. Process the Image
Use any image editor that supports DDS export (GIMP works well and needs no extra plugins).
- Resize the image to 1024 × 1024 pixels at 72 PPI.
- Save as .DDS with DXT1 compression (no alpha unless you specifically need transparency).
Name the file loadingscreen_mp_yourmapname.dds for consistency.
Save it in a folder called images inside your main Call of Duty 2 directory (create the folder if it doesn’t exist).
3. Convert the Image to CoD2 Format
Navigate to your CoD2 directory → bin folder and run Asset_Manager.exe.
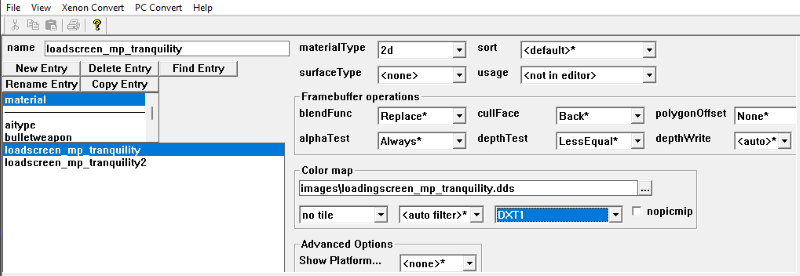
- Select material from the dropdown.
- Click New Entry.
- Name it exactly:
loadingscreen_mp_yourmapname - Set Material Type → 2D.
- Set Surface Type → none.
- In the Color Map field, browse to your DDS file in the
imagesfolder. - Set Tiling → No Tile.
- Set Compression → DXT1.
- Leave all other settings at defaults.
Go to File → Save As and save as loadingscreen_mp_yourmapname.gdt.
Then click PC Convert → Current Asset Only (or press F10).
If successful, the console window will show no errors. The converter will generate a .iwi file.
4. Apply the Loading Screen
Create a file named mp_yourmapname.csv in the folder maps/mp inside your main CoD2 directory.
The file needs only one line:
levelBriefing,loadingscreen_mp_yourmapname5. Test the Loading Screen
Run your map in multiplayer mode. The custom loading screen should appear while the map loads. If it doesn’t, double-check naming, file locations, and conversion steps.
6. Loading Bar (Required for Proper Loading Screen Display)
The loading bar won’t appear with your custom loading screen unless you include a hunkmegs.dat file with your map’s memory allocation. This is the **final required step** before packaging.
- Run your map once in multiplayer mode (this generates the
hunkmegs.datfile in your main CoD2 directory). - Open
hunkmegs.datin a text editor (Notepad works fine). - Delete all entries except your map’s line. It will look like:
Note: The number (85671712) will be different for your map – keep your exact number!maps/mp/mp_yourmapname.d3dbsp 85671712 - Save the file as
hunkmegs.dat.
⚠️ Important: This file is CRITICAL for the progress bar to work properly. Without it, players will only see the loading screen.
7. Packaging for Distribution
When packaging your map into an IWD file, include these files with the exact folder structure:
| Folder | File |
|---|---|
| ROOT (no folder) | hunkmegs.dat |
| images/ | loadingscreen_mp_yourmapname.iwi |
| maps/mp/ | mp_yourmapname.csv |
| materials/ | loadingscreen_mp_yourmapname (folder with .gdt files) |
Note: You do NOT need to include the original .dds image or temporary .gdt files used during creation.
✅ Final Checklist Before Distribution
- ☐ Custom loading screen image converted to
.iwi - ☐
mp_yourmapname.csvcreated with correct material name - ☐
hunkmegs.datgenerated, edited (your map only), and placed in IWD root - ☐ Tested in multiplayer – see custom image AND loading bar progress